
说明:本系列笔记总结自
雷丰阳老师教学项目《谷粒商城》
- 视频地址:直达BiliBili
- 完整项目地址:直达gitee
- 项目资料获取:
一、SpringCloud Alibaba
官方文档:SpringCloud Alibaba
阿里18年开发的微服务一站式解决方案,其提供的各种服务:
在common的pom.xml中加入:
<dependencyManagement>
    <dependencies>
        <dependency>
            <groupId>com.alibaba.cloud</groupId>
            <artifactId>spring-cloud-alibaba-dependencies</artifactId>
            <version>${spring.cloud.alibaba.version}</version>
            <type>pom</type>
            <scope>import</scope>
        </dependency>
    </dependencies>

    <dependencies>
        <dependency>
            <groupId>org.springframework.cloud</groupId>
            <artifactId>spring-cloud-dependencies</artifactId>
            <version>${spring-cloud.version}</version>
            <type>pom</type>
            <scope>import</scope>
        </dependency>
    </dependencies>
</dependencyManagement>
上面是dependencyManagement依赖管理,相当于以后在dependencies里引spring cloud alibaba就不用写版本号。注意他和普通依赖的区别,他只是备注一下,并没有加入依赖
二、Nacos Discovery
服务注册与发现中心
安装其服务:
-
进入bin目录:
sh startup.sh -m standalone -
Nacos Server启动后,转到http://ip:8848查看控制台(默认帐户名称/密码为nacos/nacos)
引入依赖:
<!--服务注册与发现-->
<dependency>
    <groupId>com.alibaba.cloud</groupId>
    <artifactId>spring-cloud-starter-alibaba-nacos-discovery</artifactId>
</dependency>
SpringBoot中yml文件基础配置:
spring:
  application:
	name:
	  gulimall-product	#应用名称
  cloud:
    nacos:
      discovery:
        server-addr: 127.0.0.1:8848	#服务注册与发现地址
nacos.config.bootstrap.enable=true

# 主配置服务器地址
nacos.config.server-addr=192.168.16.104:8848
# 主配置 data-id
nacos.config.data-id=people
# 主配置 group-id
nacos.config.group=DEFAULT_GROUP
# 主配置 配置文件类型
nacos.config.type=properties
# 主配置 最大重试次数
nacos.config.max-retry=10
# 主配置 开启自动刷新
nacos.config.auto-refresh=true
# 主配置 重试时间
nacos.config.config-retry-time=2333
# 主配置 配置监听长轮询超时时间
nacos.config.config-long-poll-timeout=46000
# 主配置 开启注册监听器预加载配置服务(除非特殊业务需求,否则不推荐打开该参数)
nacos.config.enable-remote-sync-config=true

nacos.config.ext-config[0].data-id=test
nacos.config.ext-config[0].group=DEFAULT_GROUP
nacos.config.ext-config[0].max-retry=10
nacos.config.ext-config[0].type=yaml
nacos.config.ext-config[0].auto-refresh=true
nacos.config.ext-config[0].config-retry-time=2333
nacos.config.ext-config[0].config-long-poll-timeout=46000
nacos.config.ext-config[0].enable-remote-sync-config=true
使用 @EnableDiscoveryClient 注解开启服务注册与发现功能:
@EnableDiscoveryClient
@SpringBootApplication
public class GulimallProductApplication {
    public static void main(String[] args) {
        SpringApplication.run(GulimallProductApplication.class, args);
    }
}
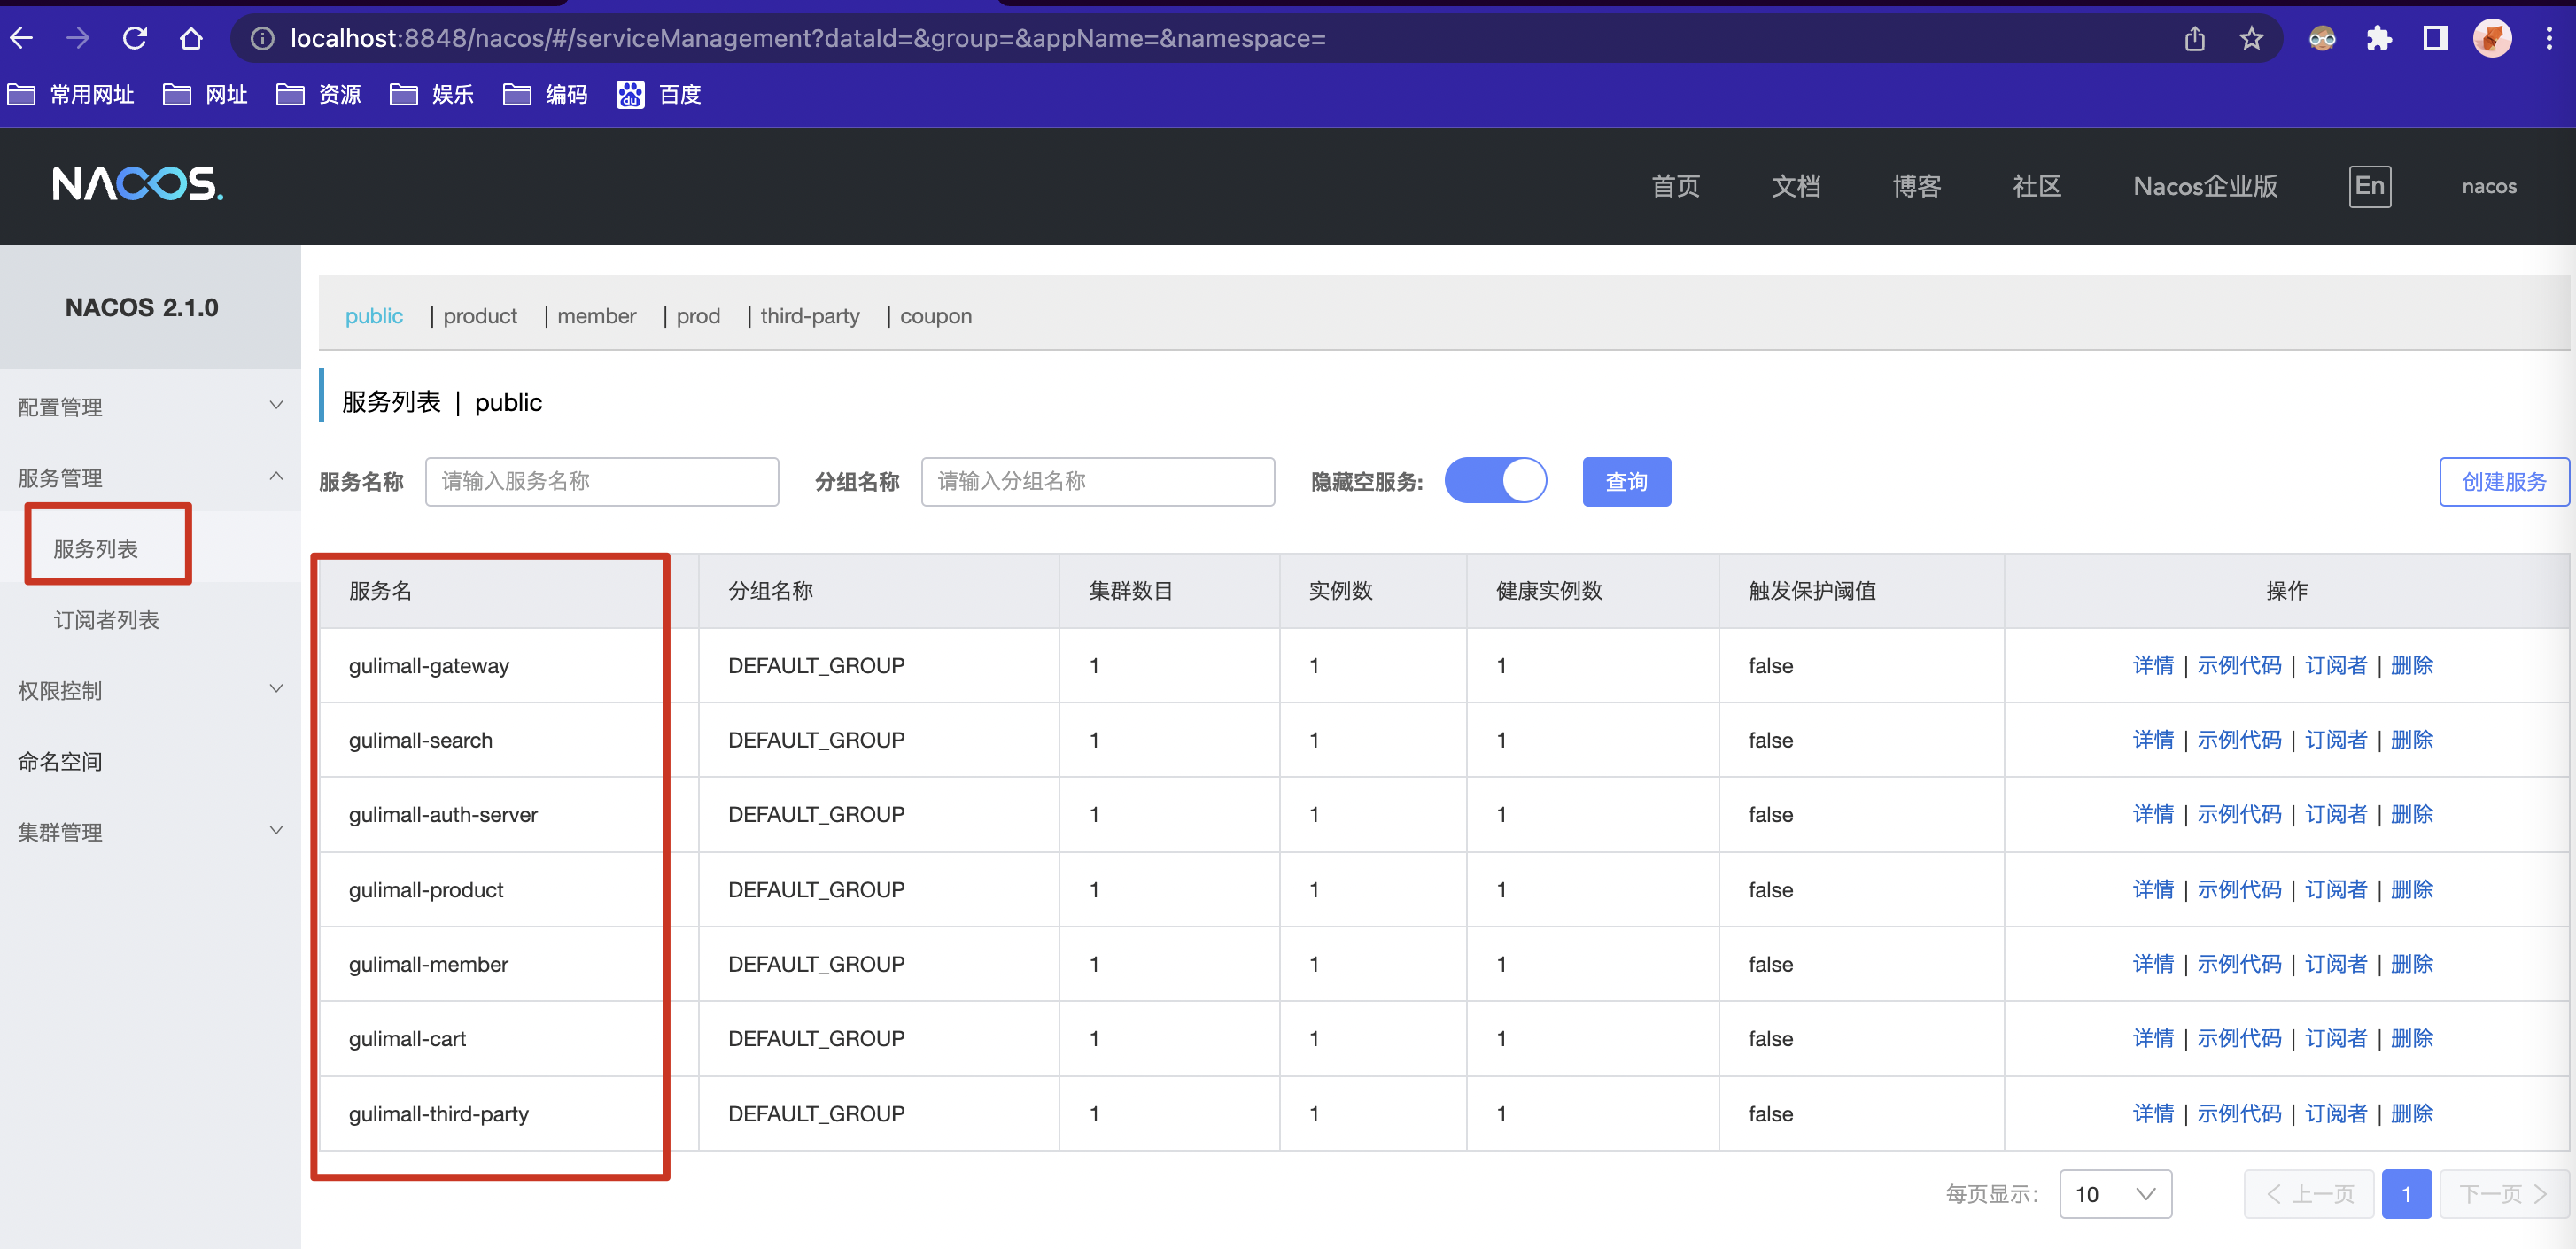
注册服务后列表中查看:
自己搭建nacos源码(推荐):https://blog.csdn.net/xiaotian5180/article/details/105478543
为了能git管理nacos及其内置的数据库,采用这种方式,方便运行时也保留原有内置数据库内容
三、Nacos Config
配置中心,结合上文使用
官方教程:GitHub
配置中心详情🔎
nacos配置中心使用步骤
- 引入依赖:
nacos-config、bootstrap
<!--nacos配置中心-->
<dependency>
    <groupId>com.alibaba.cloud</groupId>
    <artifactId>spring-cloud-starter-alibaba-nacos-config</artifactId>
</dependency>

<dependency>
    <groupId>org.springframework.cloud</groupId>
    <artifactId>spring-cloud-starter-bootstrap</artifactId>
</dependency>

<dependency>
    <groupId>org.springframework.boot</groupId>
    <artifactId>spring-boot-configuration-processor</artifactId>
    <optional>true</optional>
</dependency>
- 创建
bootstrap.properties或者bootstrap.yml文件,必要配置:
spring.application.name=gulimall-coupon
spring.cloud.nacos.config.server-addr=127.0.0.1:8848
spring.cloud.nacos.config.file-extension=properties		# 是yml文件写yml
- 在nacos配置中心中添加配置文件,命名规则如下:
dataID
在 Nacos Config Starter 中,dataId 的拼接格式如下
${prefix} - ${spring.profiles.active} . ${file-extension}
#服务名-激活的环境.后缀名   比如:gulimall-coupon.properties
-
prefix默认为spring.application.name的值,也可以通过配置项spring.cloud.nacos.config.prefix来配置。 -
spring.profiles.active即为当前环境对应的 profile,详情可以参考 Spring Boot文档注意,当 active profile 为空时,对应的连接符
-也将不存在,dataId 的拼接格式变成${prefix}.${file-extension} -
file-extension为配置内容的数据格式,可以通过配置项spring.cloud.nacos.config.file-extension来配置。 目前只支持properties类型。
group
group默认为DEFAULT_GROUP,可以通过spring.cloud.nacos.config.group配置。
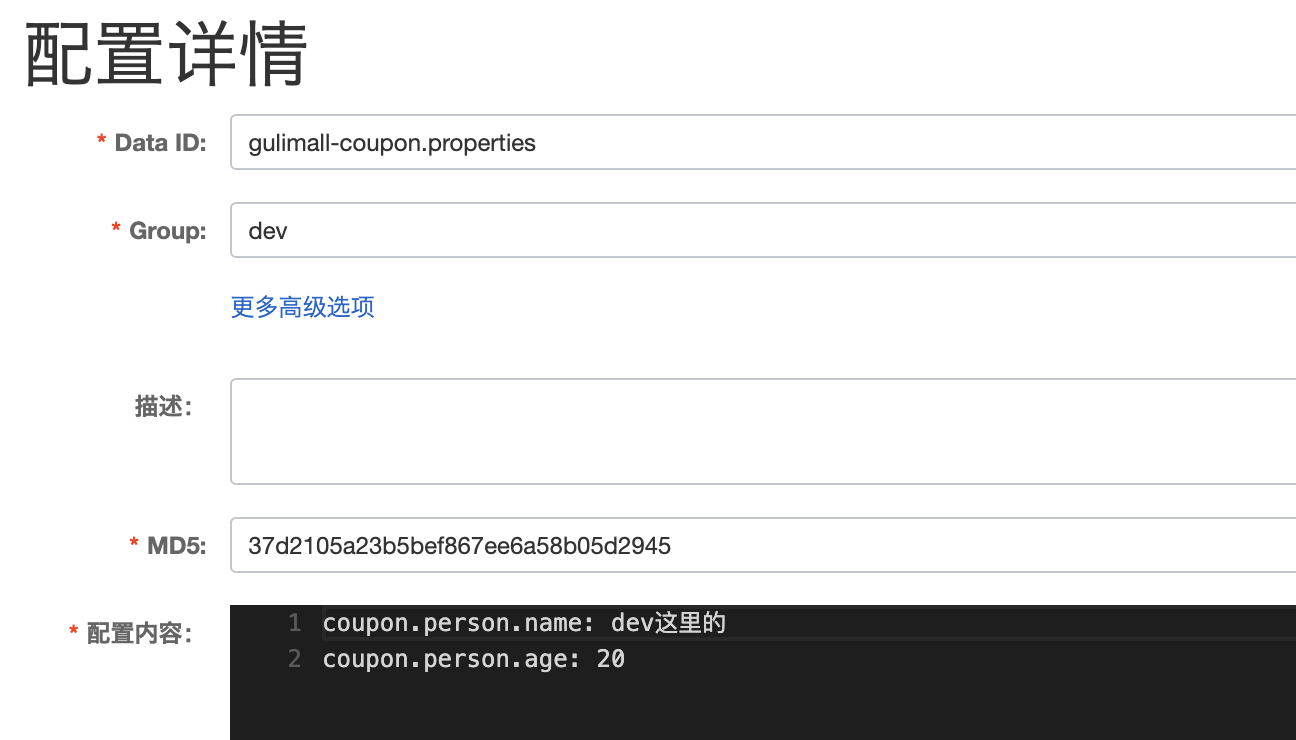
- 代码中动态EL表达式获取配置:
类上添@RefreshScop:动态获取并刷新配置
字段上添加@Value("${coupon.person.name}"):获取到值
如果配置中心和当前应用的配置文件中都配置了相同的项,优先使用配置中心的配置
读取配置示例
@RefreshScope   //实时刷新配置文件-从配置中心处读取
@RestController
public class CouponController {

    @Value("${coupon.person.name}")		//直接从配置中心取值
    private String name;
    @Value("${coupon.person.age}")
    private Integer age;

    @RequestMapping("/person")
    public R person() {
        return R.ok().put("name",name).put("age",age);
    }
}
或者:
@ConfigurationProperties(prefix = "coupon.person")
@Component
@Data
public class ReadConfig {
    private String name;
    private Integer age;
}
无需动态取值的配置:
载入配置
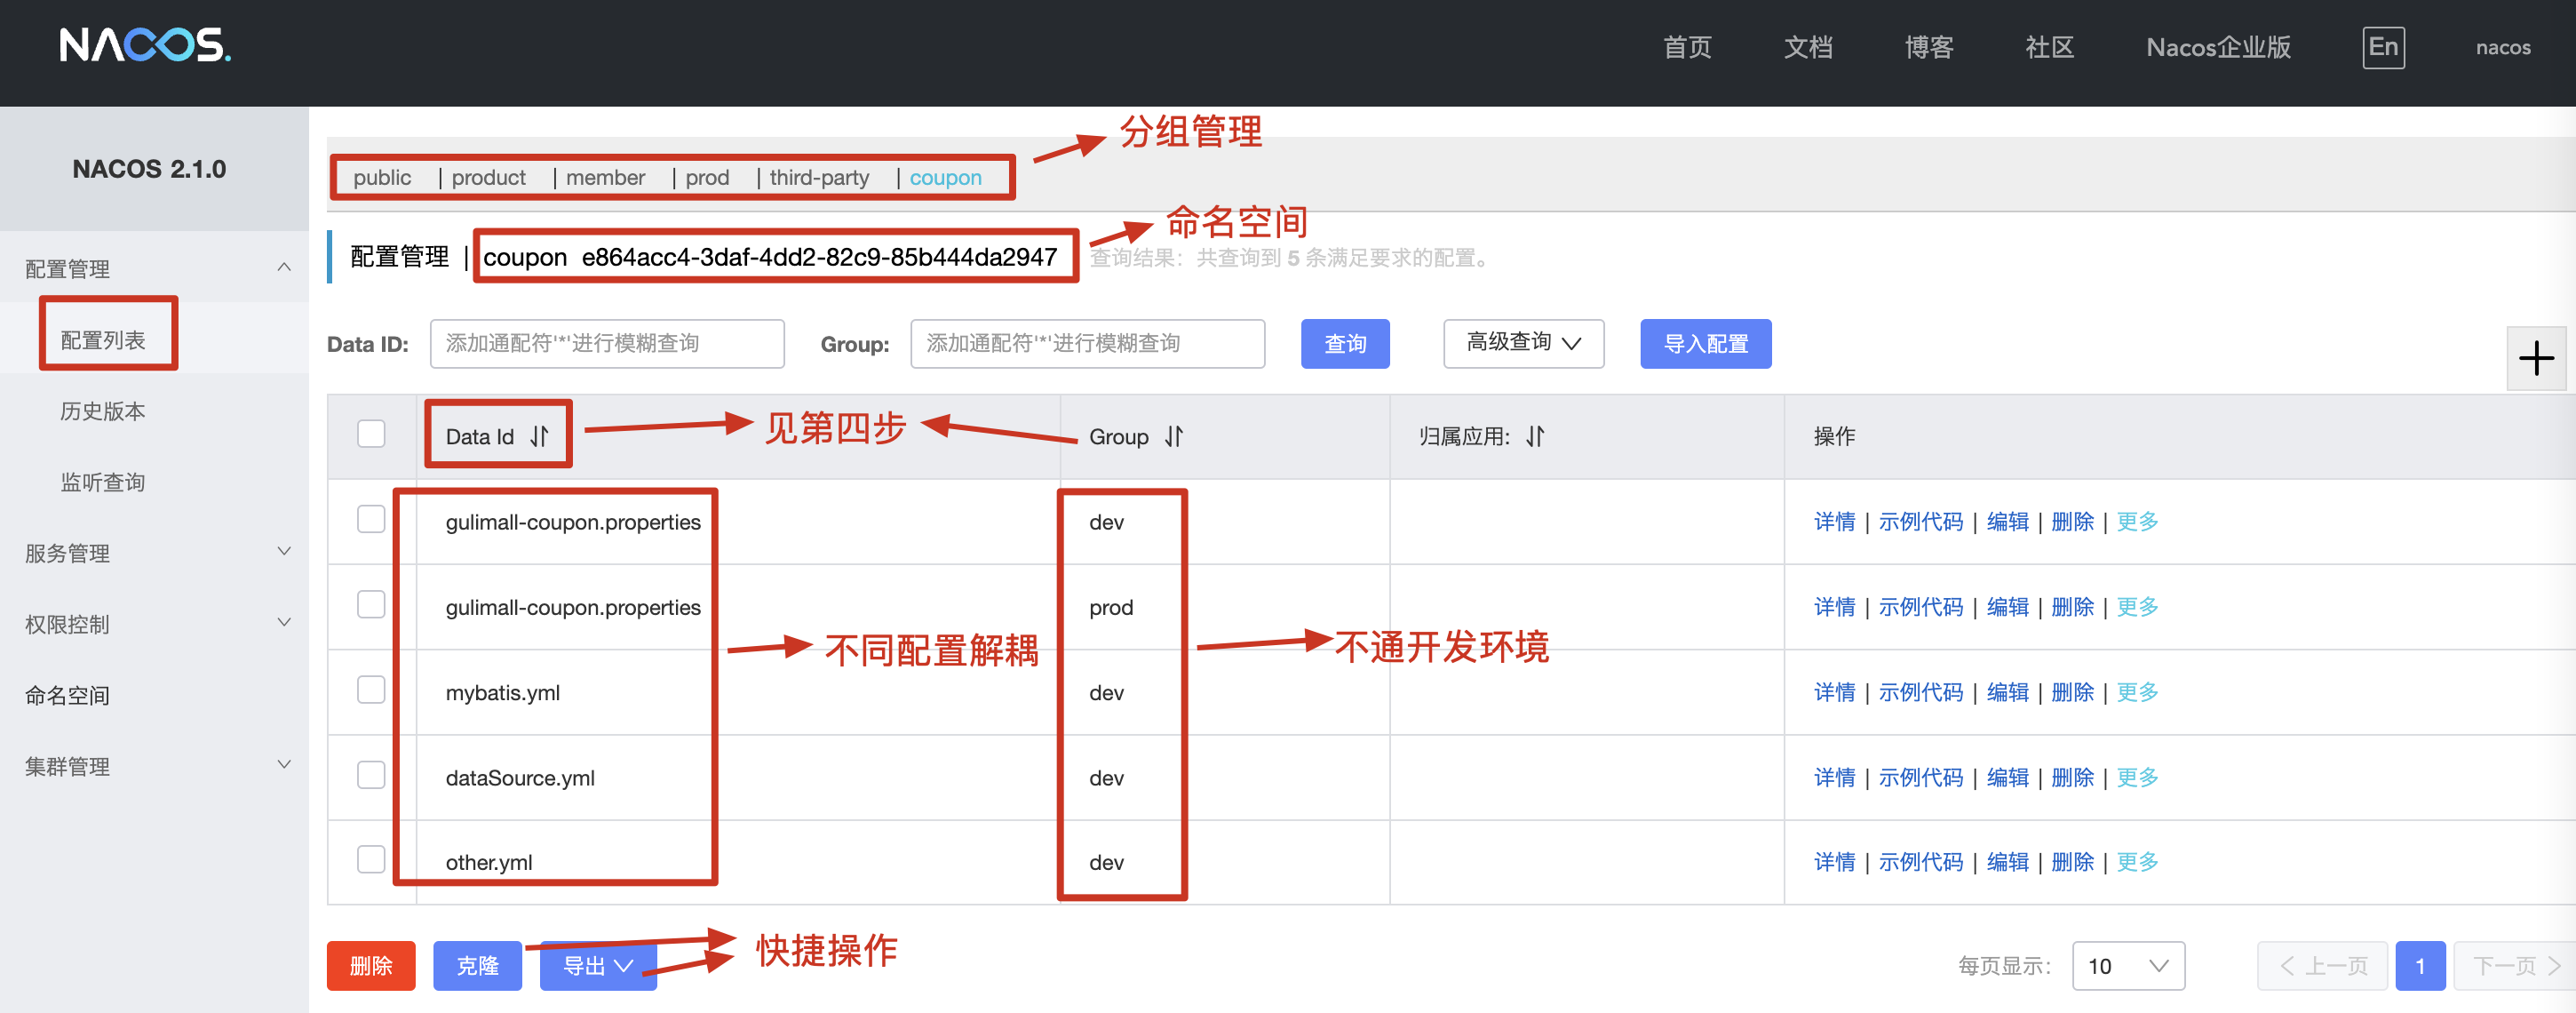
🧶命名空间->分组管理:实现服务配置隔离、不同环境之间隔离
# 加载指定命名空间,一个服务独立拥有一个命名空间
spring.cloud.nacos.config.namespace=e864acc4-3daf-4dd2-82c9-85b444da2947
# 默认加载配置组,远程没有默认配置组且这里没有指定时会尝试加载本地文件
spring.cloud.nacos.config.group=prod
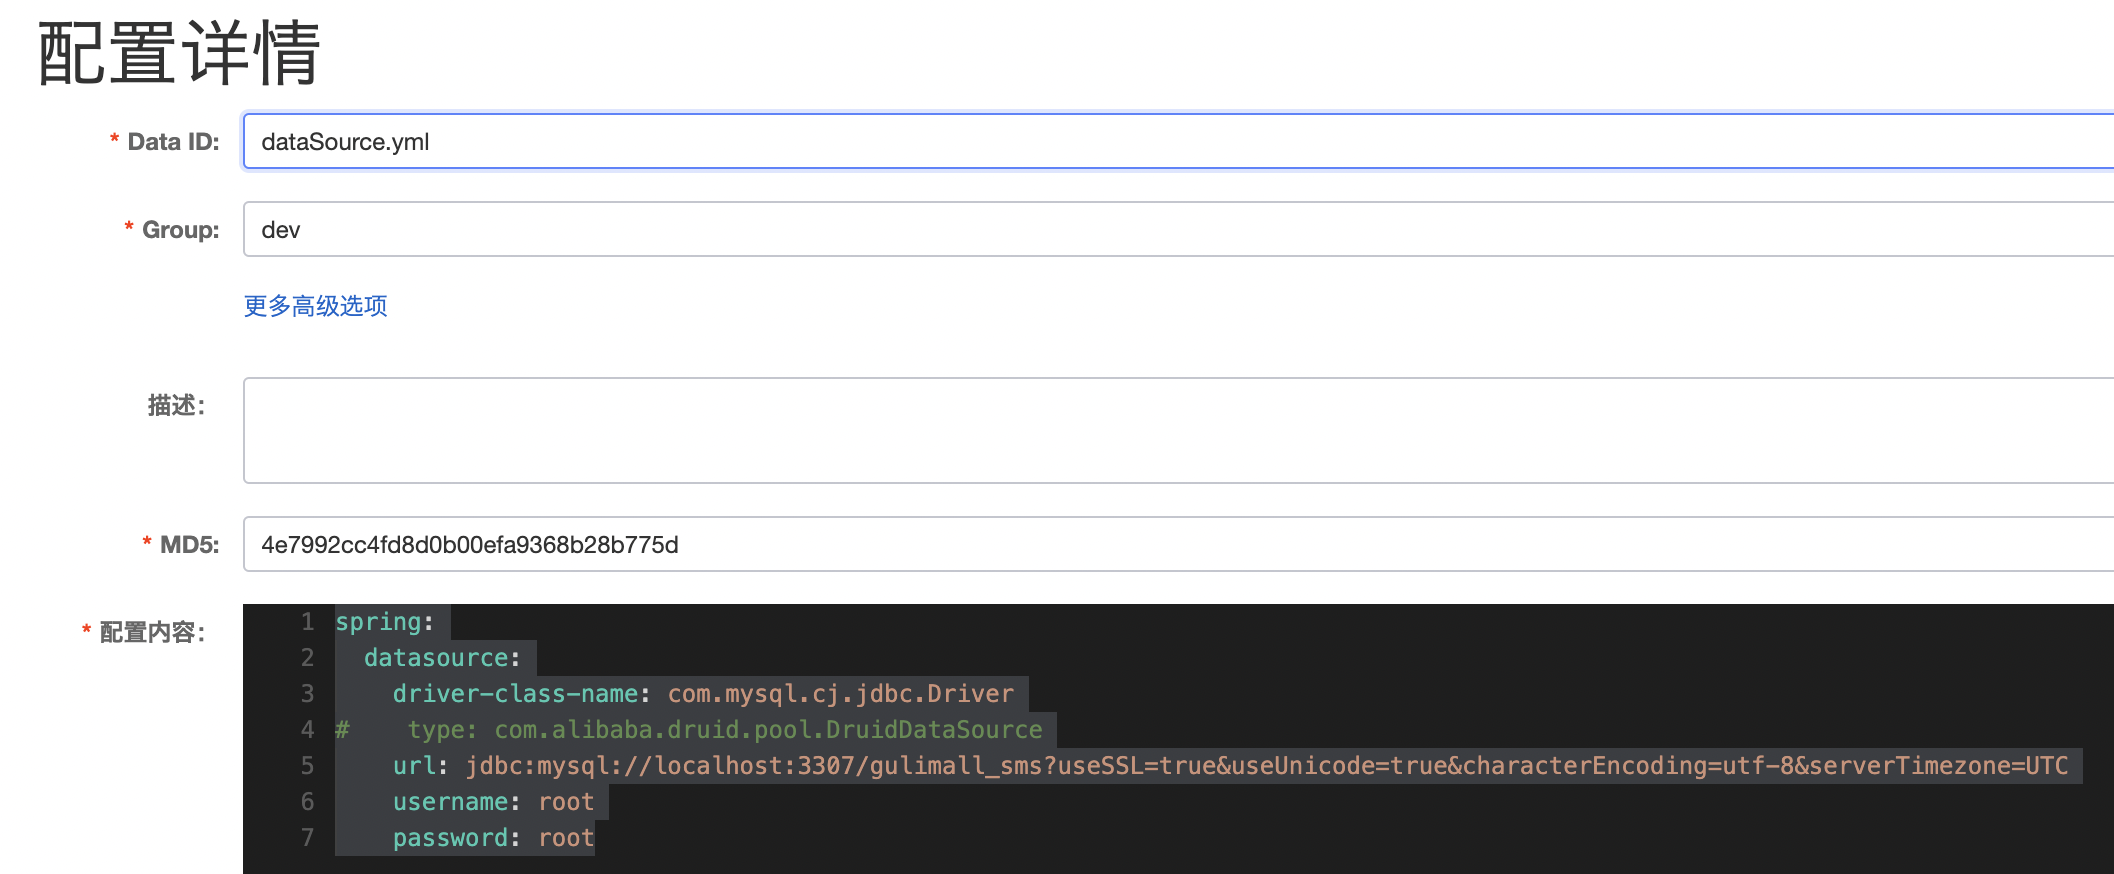
# 载入各个配置文件
# 文件名 - 分组 - 是否实时刷新
spring.cloud.nacos.config.extension-configs[0].data-id=mybatis.yml
spring.cloud.nacos.config.extension-configs[0].group=dev
spring.cloud.nacos.config.extension-configs[0].refresh=true
spring.cloud.nacos.config.extension-configs[1].data-id=dataSource.yml
spring.cloud.nacos.config.extension-configs[1].group=dev
spring.cloud.nacos.config.extension-configs[1].refresh=true
spring.cloud.nacos.config.extension-configs[2].data-id=other.yml
spring.cloud.nacos.config.extension-configs[2].group=dev
spring.cloud.nacos.config.extension-configs[2].refresh=true
四、Sentinel
官网:https://sentinelguard.io/zh-cn/index.html
github文档:https://github.com/alibaba/spring-cloud-alibaba/wiki/Sentinel
主要作用:
流控、熔断和降级
主要介绍如何使用
导入依赖
<!--Sentinel依赖--在common中引入-->
<dependency>
    <groupId>com.alibaba.cloud</groupId>
    <artifactId>spring-cloud-starter-alibaba-sentinel</artifactId>
</dependency>
<!--开启Endpoint支持--监控折线图--各个服务中引入-->
<dependency>
    <groupId>org.springframework.boot</groupId>
    <artifactId>spring-boot-starter-actuator</artifactId>
</dependency>
<!--sentinel网关限流支持--在网关服务中引入-->
<dependency>
    <groupId>com.alibaba.cloud</groupId>
    <artifactId>spring-cloud-alibaba-sentinel-gateway</artifactId>
</dependency>
编写配置
# sentinel控制台地址
spring.cloud.sentinel.transport.dashboard=127.0.0.1:7070
spring.cloud.sentinel.transport.port=8719
# 暴露所有监控端点,使得sentinel可以实时监控
management.endpoints.web.exposure.include=*
# 默认情况下,sentinel是不会对feign远程调用进行监控的,需要开启配置
feign.sentinel.enabled=true
Sentinel服务
- 前往github下载对应版本jar包
- 使用
java -jar xxx.jar --server.port=7070运行服务 - 访问localhost:7070默认账号密码为sentinel
业务使用
feign的流控和降级
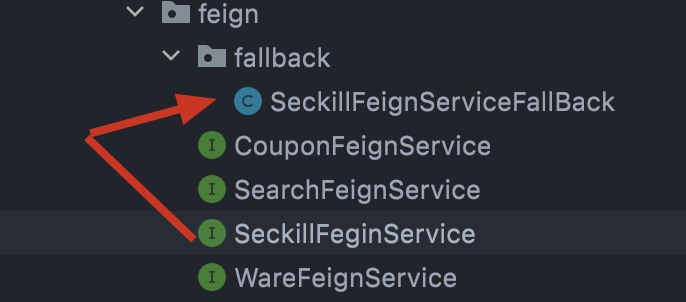
SeckillFeginService.java在@FeignClient设置fallback属性
@FeignClient(value = "gulimall-seckill",fallback = SeckillFeignServiceFallBack.class)// 被限流后的处理类
public interface SeckillFeginService {
    @GetMapping("/sku/seckill/{skuId}")
    R getSkuSeckillInfo(@PathVariable("skuId") Long skuId);
}
在降级类中实现对应的feign接口,并重写降级方法
@Slf4j
@Component
public class SeckillFeignServiceFallBack implements SeckillFeginService {
    @Override
    public R getSkuSeckillInfo(Long skuId) {
        log.info("方法调用...getSkuSeckillInfo");
        return R.error(BizCodeEnume.TOO_MANY_REQUEST.getCode(),BizCodeEnume.TOO_MANY_REQUEST.getMsg());
    }
}
降级效果:当远程服务被限流或者不可用时,会触发降级效
网关流控
- 能在网关层就进行流控,可以避免请求流入业务,减小服务压力
- 导入上述依赖
- 在
Sentinel Dashboard控制台对网关编写限流规则
在网关服务中定义限流方法:
@Configuration
public class MySentinelConfig {
    public MySentinelConfig() {
        GatewayCallbackManager.setBlockHandler((serverWebExchange, throwable) -> {
            System.err.println("调用网关降级");
            R error = R.error(BizCodeEnume.TOO_MANY_REQUEST.getCode(), BizCodeEnume.TOO_MANY_REQUEST.getMsg());
            String errJson = JSON.toJSONString(error);
            return ServerResponse.ok().body(Mono.just(errJson), String.class);
        });
    }
}
自定义限流响应
设置被限流后调用的方法,一个服务使用一个
@Configuration
public class SeckillSentinelConfig implements BlockExceptionHandler {
    @Override
    public void handle(HttpServletRequest httpServletRequest, HttpServletResponse httpServletResponse, BlockException e) throws Exception {
        R error = R.error(BizCodeEnume.TOO_MANY_REQUEST.getCode(), BizCodeEnume.TOO_MANY_REQUEST.getMsg());
        httpServletResponse.setCharacterEncoding("UTF-8");
        httpServletResponse.setContentType("application/json");
        httpServletResponse.getWriter().write(JSON.toJSONString(error));
    }
}
方法级别
自定义资源,使sentinel可以对具体对方法起作用
Service层的方法
@Override
    @SentinelResource(value = "killTest", fallback = "fallbackHandler", blockHandler = "blockHandler")
    public String kill(String killId, String key, Integer num) {...}
public String blockHandler(BlockException e) {
    log.error("kill 被限流!");
    return null;
}

public String fallbackHandler() {
    log.error("kill 异常发生!");
    return null;
}
sentinel流量规则解释
-
资源名:唯一名称,默认请求路径
-
针对来源:sentinel可以针对调用者进行限流,填写微服务名,默认default(不区分来源)
-
阈值类型/单机值:
- QPS(每秒钟的请求数量):当调用该api就QPS达到阈值的时候,进行限流
- 线程数.当调用该api的线程数达到阈值的时候,进行限流
-
单机/均摊阈值:和下面的选项有关
-
集群阈值模式:
- 单机均摊:前面设置的阈值是
每台机器的阈值 - 总体阈值:前面设置的阈值是
集群总体的阈值
- 单机均摊:前面设置的阈值是
-
流控模式:
- 直接:api达到限流条件时,直接限流。分为QPS和线程数
- 关联:当关联的资到阈值时,就限流自己。别人惹事,自己买单。当两个资源之间具有资源争抢或者依赖关系的时候,这两个资源便具有了关联。,举例来说,
read_db和write_db这两个资源分别代表数据库读写,我们可以给read_db设置限流规则来达到写优先的目的:设置strategy为RuleConstant.STRATEGY_RELATE同时设置refResource为write_db。这样当写库操作过于频繁时,读数据的请求会被限流。 - 链路:只记录指定链路上的流量(指定资源从入口资源进来的流量,如果达到阈值,就进行限流)【api级别的针对来源】
-
流控效果:
- 快速失败:直接拒绝。当QPS超过任意规则的阈值后,新的请求就会被立即拒绝,拒绝方式为抛出
FlowException - warm up:若干秒后才能达到阈值。当系统长期处于低水位的情况下,当流量突然增加时,直接把系统拉升到高水位可能瞬间把系统压垮。通过"冷启动",让通过的流量缓慢增加,在一定时间内逐渐增加到阈值上限,给冷系统一个预热的时间,避免冷系统被压垮
- 排队等待:让请求以均匀的速度通过
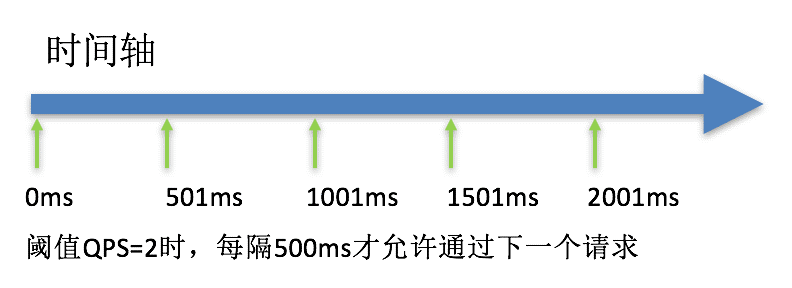
- 快速失败:直接拒绝。当QPS超过任意规则的阈值后,新的请求就会被立即拒绝,拒绝方式为抛出
五、OSS
阿里云对象存储服务
引入依赖:
<!--阿里云对象存储-->
<dependency>
    <groupId>com.alibaba.cloud</groupId>
    <artifactId>spring-cloud-starter-alicloud-oss</artifactId>
</dependency>
写入配置:
spring:
  cloud:
    alicloud:
      access-key: LTAI5t5broXN3Sj1d1Q5bMqT			# 阿里云子账户
      secret-key: 5w4Kmt6tFHttwUPbksY2pvBINYgT0
      oss:
        endpoint: oss-cn-nanjing.aliyuncs.com		# 按实际开通填写
        bucket: gulimall-konan
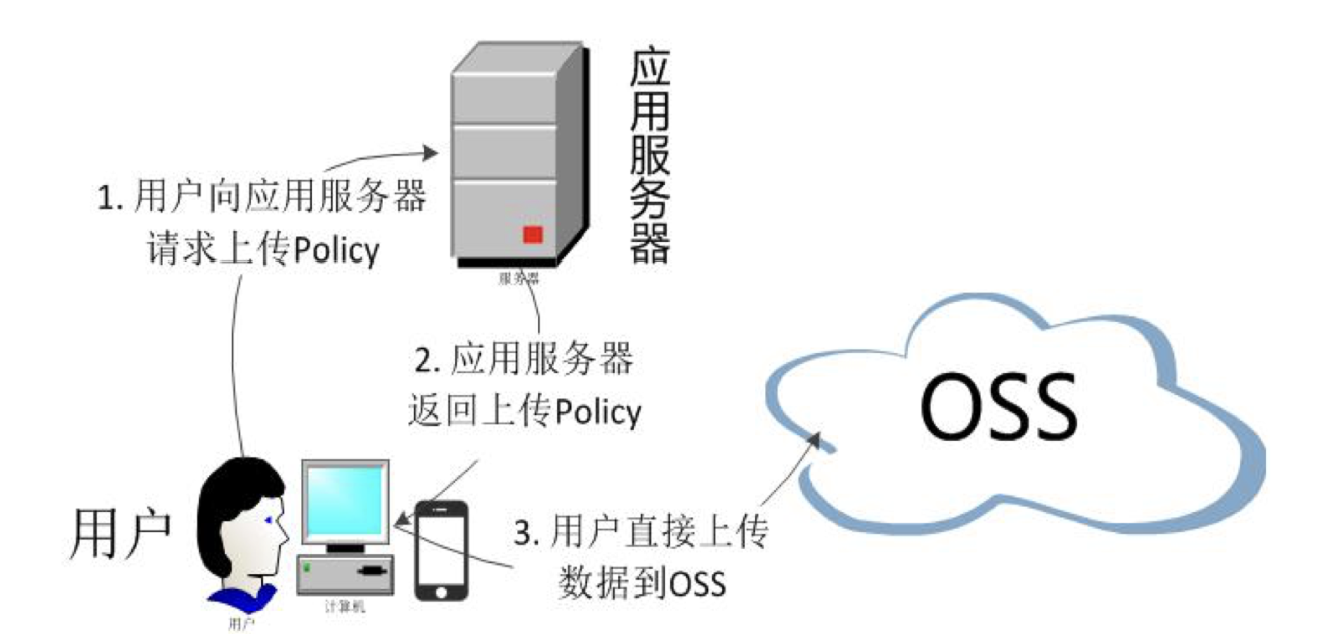
提供签名服务时
官网文档:https://help.aliyun.com/document_detail/91868.html#section-ooq-y64-6og
@Slf4j
@RestController
public class OssController {

    @Value("${spring.cloud.alicloud.access-key}")
    private String accessId;
    @Value("${spring.cloud.alicloud.secret-key}")
    private String accessKey;
    @Value("${spring.cloud.alicloud.oss.bucket}")
    private String bucket;
    @Value("${spring.cloud.alicloud.oss.endpoint}")
    private String endpoint;

    @Autowired
    private OSS oss;

    @RequestMapping("/oss/policy")
    public R policy() {
        System.out.println("拿签名。。。");

        String host = "https://"+bucket+"."+endpoint;        // 填写Host地址,格式为https://bucketname.endpoint。

        // 设置上传到OSS文件的前缀,可置空此项。置空后,文件将上传至Bucket的根目录下。
        String format = new SimpleDateFormat("yyyy-MM-dd").format(new Date());
        String dir = format+"/";

        Map<String, String> respMap = null;
        try {
            long expireTime = 30;
            long expireEndTime = System.currentTimeMillis() + expireTime * 1000;
            Date expiration = new Date(expireEndTime);
            PolicyConditions policyConds = new PolicyConditions();
            policyConds.addConditionItem(PolicyConditions.COND_CONTENT_LENGTH_RANGE, 0, 1048576000);
            policyConds.addConditionItem(MatchMode.StartWith, PolicyConditions.COND_KEY, dir);

            String postPolicy = oss.generatePostPolicy(expiration, policyConds);
            byte[] binaryData = postPolicy.getBytes(StandardCharsets.UTF_8);
            String encodedPolicy = BinaryUtil.toBase64String(binaryData);
            String postSignature = oss.calculatePostSignature(postPolicy);

            respMap = new LinkedHashMap<>();
            respMap.put("accessid", accessId);
            respMap.put("policy", encodedPolicy);
            respMap.put("signature", postSignature);
            respMap.put("dir", dir);
            respMap.put("host", host);
            respMap.put("expire", String.valueOf(expireEndTime / 1000));

        } catch (Exception e) {
            log.info(e.getMessage());
        } finally {
            oss.shutdown();
        }
        return R.ok().put("data",respMap);
    }
}
Vue上传组件:
//拿签名
import http from '@/utils/httpRequest.js'

export function policy () {
  return new Promise((resolve, reject) => {
    http({
      url: http.adornUrl('/thirdparty/oss/policy'),
      method: 'get',
      params: http.adornParams({})
    }).then(({data}) => {
      resolve(data)
    })
  })
}
//文件上传组件的部分请求
beforeUpload (file) {
  let _self = this
  return new Promise((resolve, reject) => {
    policy()
      .then(response => {
        console.log('这是什么${filename}')
        _self.dataObj.policy = response.data.policy
        _self.dataObj.signature = response.data.signature
        _self.dataObj.ossaccessKeyId = response.data.accessid
        _self.dataObj.key = response.data.dir + getUUID() + '_${filename}'
        _self.dataObj.dir = response.data.dir
        _self.dataObj.host = response.data.host
        resolve(true)
      })
      .catch(err => {
        console.log('出错了...', err)
        reject(false)
      })
  })
}
后端直接上传文件
@SpringBootTest
class GulimallThirdPartyApplicationTests {

    @Autowired
    private OSS ossClient;

    @SneakyThrows
    @Test
    void testUploadByCloud() {

        String bucketName = "gulimall-konan";

        InputStream fileInputStream = new FileInputStream("/Users/ppsn/Pictures/pap.er/kBm_cGVcXr4.jpg");

        ossClient.putObject(bucketName,"testCloud02.jpg",fileInputStream);
        ossClient.shutdown();
        System.out.println("上传完成....");
    }
}
各种增删改查操作直接操作注入的ossClient对象即可!
六、SMS
阿里云短信服务
引入依赖:
<dependency>
    <groupId>com.alibaba.cloud</groupId>
    <artifactId>spring-cloud-starter-alicloud-sms</artifactId>
</dependency>
编写配置:
spring:
  cloud:
    alicloud:
      sms:
        appcode: b00820ff4ca54ffdae1eebc0e5596303	# 填写自己开通的短信服务令牌
        template_id: TPL_0001
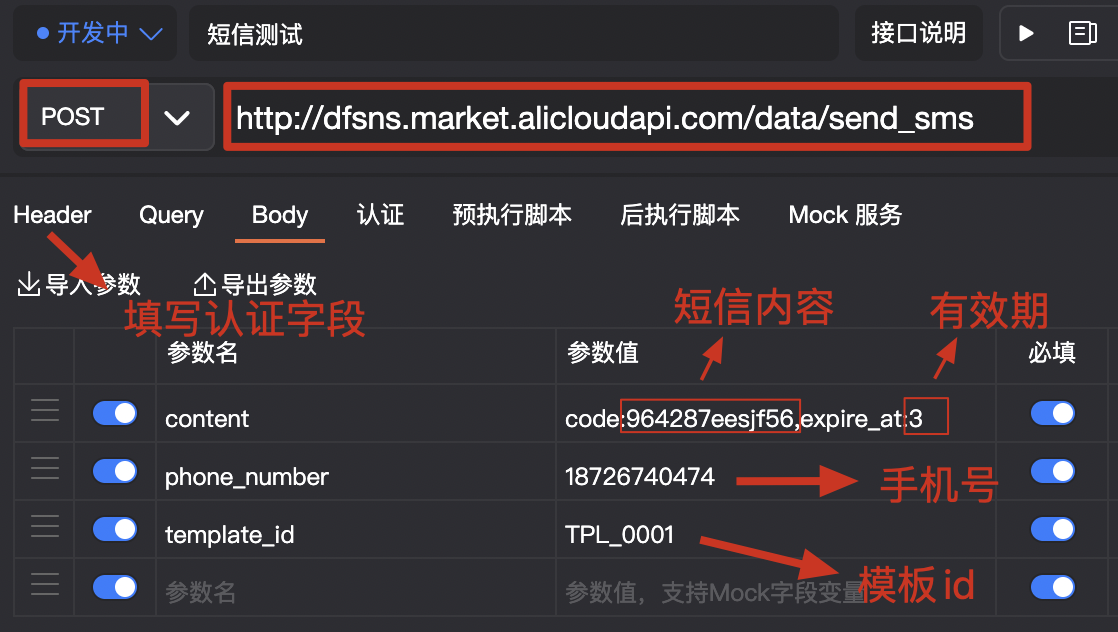
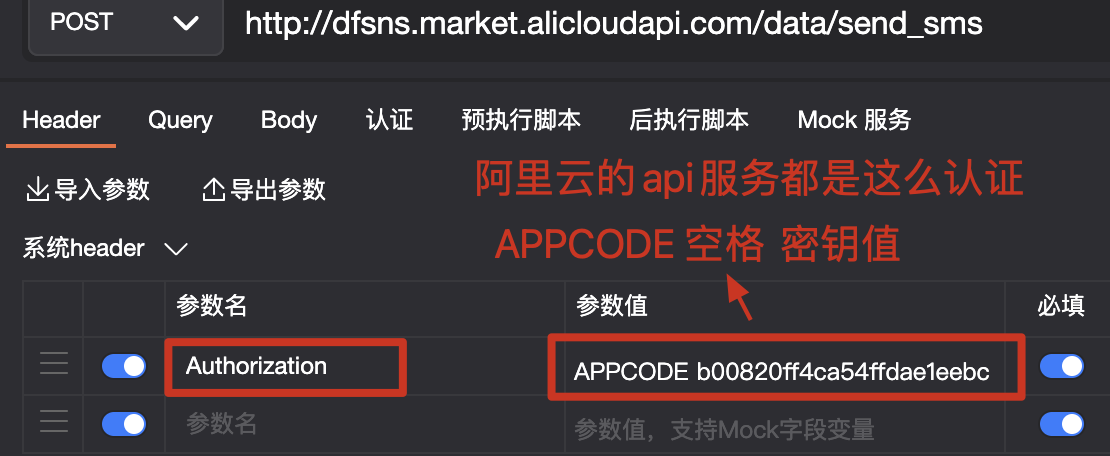
使用ApiPost测试:
业务代码示例:
@ConfigurationProperties(prefix = "spring.cloud.alicloud.sms")
@Component
@Data
public class MyAccess {
    private String appcode;
    private String template_id;
}
@RestController
@CrossOrigin
@RequestMapping("/sms")
public class SmsApiController {
    @Autowired
    private SendSms sendSms;

    @Autowired
    private MyAccess access;

    @GetMapping("/sendcode")
    public R sendCode(@RequestParam("phone") String phone, @RequestParam("code") String code){
        System.out.println("调用短信验证码服务。。。");
        sendSms.send(access,phone,code);
        return R.ok();
    }
}
@Service
public interface SendSms {
    boolean send(MyAccess access, String phoneNum, String code);
}
@Service
public class SendSmsImpl implements SendSms {

    @Override
    public boolean send(MyAccess access, String phoneNum, String code) {
        String host = "https://dfsns.market.alicloudapi.com";
        String path = "/data/send_sms";
        String method = "POST";
        String appcode = access.getAppcode();
        String template = access.getTemplate_id();
        Map<String, String> headers = new HashMap<>();
        //最后在header中的格式(中间是英文空格)为Authorization:APPCODE 83359fd73fe94948385f570e3c139105
        headers.put("Authorization", "APPCODE " + appcode);
        //根据API的要求,定义相对应的Content-Type
        headers.put("Content-Type", "application/x-www-form-urlencoded; charset=UTF-8");
        Map<String, String> querys = new HashMap<>();
        Map<String, String> bodys = new HashMap<>();
        bodys.put("content", "code:"+code+",expire_at:3");
        bodys.put("phone_number", phoneNum);
        bodys.put("template_id", template);


        try {
            HttpResponse response = HttpUtils.doPost(host, path, method, headers, querys, bodys);
            System.out.println(response.toString());
            //获取response的body
            //System.out.println(EntityUtils.toString(response.getEntity()));
        } catch (Exception e) {
            e.printStackTrace();
        }
        return false;
    }
}
当然要要引入http工具类!
至此,介绍的都是SpringCloud Alibaba的分布式组件!
七、OpenFeign
声明式远程调用,feign是一个声明式的HTTP客户端
官网文档:https://spring.io/projects/spring-cloud-openfeign#learn
使用openfeign远程调用其他服务,前提是各个服务已经注册进了注册中心!
- 引入openfeign、loadbalancer依赖
<dependency>
    <groupId>org.springframework.cloud</groupId>
    <artifactId>spring-cloud-starter-openfeign</artifactId>
</dependency>
<dependency>
    <groupId>org.springframework.cloud</groupId>
    <artifactId>spring-cloud-starter-loadbalancer</artifactId>
</dependency>
- 编写openfeign接口
- 单独创建feign包
- 类上写上@FeignClient(“gulimall-coupon”) //要调用的服务的注册中心的服务名
- 类中编写和远程服务一样的接口:
@FeignClient("gulimall-coupon") //要调用的服务的注册中心的服务名
public interface CouponFeignService {

    //测试远程调用
    @RequestMapping("/coupon/coupon/member/list")
    R membercoupons();

}
- 使用注解开启远程调用功能
@EnableFeignClients(basePackages = "com.qiandao.gulimall.member.feign")
@EnableDiscoveryClient
@SpringBootApplication
public class GulimallMemberApplication {
    public static void main(String[] args) {
        SpringApplication.run(GulimallMemberApplication.class, args);
    }
}
- 在业务中注入相应的FeignService使用其方法即可!
Feign远程调用请求头失效问题,该问题在需要session域认证时无法通过
原因是因为Feign远程调用会丢失请求头信息!
解决:在被调用的服务中添加如下配置类:
@Configuration
public class GuliFeignConfig {

    @Bean("requestInterceptor")
    public RequestInterceptor requestInterceptor() {
        return new RequestInterceptor() {
            @Override
            public void apply(RequestTemplate template) {
                //1.RequestContextHolder拿到request请求(通过threadLocal)
                ServletRequestAttributes attributes = (ServletRequestAttributes) RequestContextHolder.getRequestAttributes();
                HttpServletRequest request = attributes.getRequest();//旧请求
                if (request != null) {
                    //2.同步请求头信息Cookie
                    String cookie = request.getHeader("Cookie");
                    //给新请求同步cookie
                    template.header("Cookie", cookie);
                    //System.out.println("feign远程之前先进行requestInterceptor()");
                }
            }
        };
    }
}
八、GateWay
路由网关 网关是请求流量的入口,常用功能包括路由转发,权限校验,限流控制等
springcloud
gateway取代了zuul网关。
网关会接管一个项目中所有的请求,之后可以做负载均衡、按规则分发请求
三大核心概念
- Route: The basic building block of the gateway. It is defined by an ID, a destination URI, a collection of predicates断言, and a collection of filters. A route is matched if the aggregate predicate is true.发一个请求给网关,网关要将请求路由到指定的服务。路由有id,目的地uri,断言的集合,匹配了断言就能到达指定位置
- Predicate断言: This is a Java 8 Function Predicate. The input type is a Spring Framework
ServerWebExchange. This lets you match on anything from the HTTP request, such as headers or parameters.就是java里的断言函数,匹配请求里的任何信息,包括请求头等。根据请求头路由哪个服务 - Filter: These are instances of Spring Framework
GatewayFilterthat have been constructed with a specific factory. Here, you can modify requests and responses before or after sending the downstream request.过滤器请求和响应都可以被修改
客户端发请求给服务端。中间有网关。先交给映射器,如果能处理就交给handler处理,然后交给一系列filer,然后给指定的服务,再返回回来给客户端
断言规则
一个请求在抵达网关层后,首先就要进行断言匹配,在满足所有断言之后才会进入Filter阶段
参见文章:
gateway网关的断言(predicate)和过滤(filter)
项目使用实例
引入依赖:
<dependency>
    <groupId>org.springframework.cloud</groupId>
    <artifactId>spring-cloud-starter-gateway</artifactId>
</dependency>

<dependency>
    <groupId>org.springframework.cloud</groupId>
    <artifactId>spring-cloud-starter-loadbalancer</artifactId>
</dependency>
编写yaml文件:
spring:
  cloud:
    gateway:
      routes:
        - id: baidu_route
          uri: https://www.baidu.com
          predicates:
            - Query=url,baidu	# 请求参数里面带url=baidu即跳转到百度

        - id: product_route
          uri: lb://gulimall-product
          predicates:
            - Path=/api/product/**		# 匹配以/api/product/**路径的URL
          filters:
            - RewritePath=/api/(?<segment>.*),/$\{segment}	# 去除api前缀

        - id: admin_route
          uri: lb://renren-fast             # 路由给renren-fast,lb代表负载均衡
          predicates:                       # 什么情况下路由给它
            - Path=/api/**                  # 默认前端项目都带上api前缀
          filters:
            - RewritePath=/api/(?<segment>.*),/renren-fast/$\{segment}

        - id: gulimall_product_route
          uri: lb://gulimall-product
          predicates:
            - Host=gulimall.com,item.gulimall.com	# 匹配host中携带指定主机地址的请求
在网关服务配置全局跨域
@Configuration // gateway
public class GulimallCorsConfiguration {

    @Bean // 添加过滤器
    public CorsWebFilter corsWebFilter(){
        // 基于url跨域,选择reactive包下的
        UrlBasedCorsConfigurationSource source=new UrlBasedCorsConfigurationSource();
        // 跨域配置信息
        CorsConfiguration corsConfiguration = new CorsConfiguration();
        // 允许跨域的头
        corsConfiguration.addAllowedHeader("*");
        // 允许跨域的请求方式,允许任何方法
        corsConfiguration.addAllowedMethod("*");
        // 允许跨域的请求来源,允许任何域名
        corsConfiguration.addAllowedOriginPattern("*");
        //预检请求的有效期,单位是秒
        corsConfiguration.setMaxAge(3600L);
        // 是否允许携带cookie跨域、是否支持安全证书
        corsConfiguration.setAllowCredentials(true);

        // 任意url都要进行跨域配置
        source.registerCorsConfiguration("/**",corsConfiguration);
        return new CorsWebFilter(source);
    }
}
九、SpringSession
解决 session 共享的问题,Session 信息存储在 Redis 中
使用示例
导入依赖:
<dependency>
    <groupId>org.springframework.session</groupId>
    <artifactId>spring-session-data-redis</artifactId>
</dependency>
<dependency>
    <groupId>org.springframework.boot</groupId>
    <artifactId>spring-boot-starter-data-redis</artifactId>
</dependency>
编写yml文件:
spring:
  cloud:
    nacos:
      config:
        server-addr: 127.0.0.1:8848
  redis:
    host: 127.0.0.1
    port: 6380
  #springSession配置
  session:
    store-type: redis

#springSession的存活时间(分钟)
server:
  servlet:
    session:
      timeout: 30m
编写配置类:
@Configuration
public class GulimallSessionConfig {

    //springSession
    @Bean
    public CookieSerializer cookieSerializer(){
        DefaultCookieSerializer cookieSerializer = new DefaultCookieSerializer();
        //session作用域
        cookieSerializer.setDomainName("gulimall.com");
        cookieSerializer.setCookieName("GULISESSION");
        return cookieSerializer;
    }

    @Bean
    public RedisSerializer<Object> springSessionDefaultRedisSerializer(){
        //序列化机制--更改为json序列化
        return new GenericJackson2JsonRedisSerializer();
    }
}
开启服务:
@EnableRedisHttpSession		//开启SpringSession功能
@EnableDiscoveryClient
@SpringBootApplication(exclude = DataSourceAutoConfiguration.class)
public class GulimallAuthServerApplication {

    public static void main(String[] args) {
        SpringApplication.run(GulimallAuthServerApplication.class, args);
    }

}
业务中使用:
if (oauthlogin.getCode() == 0) {
    Object data =  oauthlogin.get("memberEntity");
    log.info("登录成功:用户:{}",data);
    //登录成功调回首页
    //第一次使用session,命令浏览器保存卡号,JsessionId的cookie
    //子域之间,发卡的时候(指定域名为父域名),即使是子域发卡,父域也可使用
    session.setAttribute("loginUser",data);	//这里存储session
    return "redirect:http://gulimall.com";
}
查看redis数据库中:

查看浏览器控制台:

评论