
1. 创建master
docker run -d \
--name mysql8-master \
-p 3310:3306 \
-v /home/docker/mysql8-master/conf.d:/etc/mysql/conf.d  \
-v /home/docker/mysql8-master/data:/var/lib/mysql \
-e MYSQL_ROOT_PASSWORD=1234Abc666 \
--restart always mysql:8.0.26
docker会自动拉取mysql镜像
要检查服务器的相应端口有没有开放
2. 修改master配置文件
由于容器内的/etc/mysql/my.cnf 挂载时报错,所以去掉下面这一句
-v /home/docker/mysql8-master/my.cnf:/etc/mysql/my.cnf \
但是我们想要修改只能直接修改容器内的my.cnf
而容器内又没有vim或vi命令,只能采用复制的方式修改文件
拷贝容器内文件到主机:
docker cp 38ebd2afb25d:/etc/mysql/my.cnf /home/docker/mysql8-master/my.cnf
使用如下命令修改文件
vim /home/docker/mysql8-master/my.cnf
修改原文件如下:
#
# This program is free software; you can redistribute it and/or modify
# it under the terms of the GNU General Public License as published by
# the Free Software Foundation; version 2 of the License.
#
# This program is distributed in the hope that it will be useful,
# but WITHOUT ANY WARRANTY; without even the implied warranty of
# MERCHANTABILITY or FITNESS FOR A PARTICULAR PURPOSE.  See the
# GNU General Public License for more details.
#
# You should have received a copy of the GNU General Public License
# along with this program; if not, write to the Free Software
# Foundation, Inc., 51 Franklin St, Fifth Floor, Boston, MA  02110-1301 USA

#
# The MySQL  Server configuration file.
#
# For explanations see
# http://dev.mysql.com/doc/mysql/en/server-system-variables.html

[mysqld]
pid-file        = /var/run/mysqld/mysqld.pid
socket          = /var/run/mysqld/mysqld.sock
datadir         = /var/lib/mysql
secure-file-priv= NULL

server-id=100		#主服务器唯一ID
log-bin=mysql-bin	#启用二进制日志,后面的名字随意指定,后面会用到
#binlog-do-db = test
binlog-ignore-db = mysql	#设置不要复制的数据库(设置了4个)
binlog-ignore-db = sys
binlog-ignore-db = performance_scheme
binlog-ignore-db = information_scheme
binlog_format=row			#设置logbin格式

# Custom config should go here
!includedir /etc/mysql/conf.d/
再执行命令拷贝到容器内:
docker cp /home/docker/mysql8-master/my.cnf 38ebd2afb25d:/etc/mysql/my.cnf
重启容器:
docker restart 38ebd2afb25d
尝试远程连接一下,看是否报错:
mysql -h 82.157.192.57 -uroot -p1234Abc666 -P3310
其他配置解释
Master节点配置
> vim /etc/my.cnf
[mysqld]
## 同一局域网内注意要唯一
server-id=100
## 开启二进制日志功能,可以随便取(关键)
log-bin=mysql-bin
## 复制过滤:不需要备份的数据库,不输出(mysql库一般不同步)
binlog-ignore-db=mysql
## 为每个session 分配的内存,在事务过程中用来存储二进制日志的缓存
binlog_cache_size=1M
## 主从复制的格式(mixed,statement,row,默认格式是statement)
binlog_format=mixed
Slave节点配置
> vim /etc/my.cnf
[mysqld]
## 设置server_id,注意要唯一
server-id=102
## 开启二进制日志功能,以备Slave作为其它Slave的Master时使用
log-bin=mysql-slave-bin
## relay_log配置中继日志
relay_log=edu-mysql-relay-bin
##复制过滤:不需要备份的数据库,不输出(mysql库一般不同步)
binlog-ignore-db=mysql
## 如果需要同步函数或者存储过程
log_bin_trust_function_creators=true
## 为每个session 分配的内存,在事务过程中用来存储二进制日志的缓存
binlog_cache_size=1M
## 主从复制的格式(mixed,statement,row,默认格式是statement)
binlog_format=mixed
## 跳过主从复制中遇到的所有错误或指定类型的错误,避免slave端复制中断。
## 如:1062错误是指一些主键重复,1032错误是因为主从数据库数据不一致
slave_skip_errors=1062
binlog 日志三种格式
- Statement(Statement-Based Replication,SBR):每一条会修改数据的 SQL 都会记录在 binlog 中。
- Row(Row-Based Replication,RBR):不记录 SQL 语句上下文信息,仅保存哪条记录被修改。
- Mixed(Mixed-Based Replication,MBR):Statement 和 Row 的混合体。
3. 创建slave
docker run -d \
--name mysql8-slave \
-p 3320:3306 \
-v /home/docker/mysql8-slave/conf.d:/etc/mysql/conf.d  \
-v /home/docker/mysql8-slave/data:/var/lib/mysql \
-e MYSQL_ROOT_PASSWORD=1234Abc666 \
--restart always mysql:8.0.26
4. 修改slave配置文件
同上,不在赘述,只表达命令
docker cp b33b7a4b0317:/etc/mysql/my.cnf /home/docker/mysql8-slave/my.cnf
vim /home/docker/mysql8-slave/my.cnf
# Copyright (c) 2017, Oracle and/or its affiliates. All rights reserved.
#
# This program is free software; you can redistribute it and/or modify
# it under the terms of the GNU General Public License as published by
# the Free Software Foundation; version 2 of the License.
#
# This program is distributed in the hope that it will be useful,
# but WITHOUT ANY WARRANTY; without even the implied warranty of
# MERCHANTABILITY or FITNESS FOR A PARTICULAR PURPOSE.  See the
# GNU General Public License for more details.
#
# You should have received a copy of the GNU General Public License
# along with this program; if not, write to the Free Software
# Foundation, Inc., 51 Franklin St, Fifth Floor, Boston, MA  02110-1301 USA

#
# The MySQL  Server configuration file.
#
# For explanations see
# http://dev.mysql.com/doc/mysql/en/server-system-variables.html

[mysqld]
pid-file        = /var/run/mysqld/mysqld.pid
socket          = /var/run/mysqld/mysqld.sock
datadir         = /var/lib/mysql
secure-file-priv= NULL

server-id=101 		#注意主要是server-id不能和主服务器相同,
log-bin=mysql-slave-bin
relay_log=edu-mysql-relay-bin	#启用中继日志
#binlog-do-db = test
binlog-ignore-db = mysql
binlog-ignore-db = sys
binlog-ignore-db = performance_scheme
binlog-ignore-db = information_scheme
binlog_format=row
# Custom config should go here
!includedir /etc/mysql/conf.d/
docker cp /home/docker/mysql8-slave/my.cnf b33b7a4b0317:/etc/mysql/my.cnf
docker restart b33b7a4b0317
mysql -h 82.157.192.57 -uroot -p1234Abc666 -P3320
若连接时报错 1129 (HY000): Host ‘’ is blocked because of many connection errors;
出错原因是:一段时间内,重复多次连接msyql服务器,连接到一半就不连接了,并且没有登录成功
简述mysql连接流程:
-
根据mysql连接协议,发起握手,在网络层面里
-
mysql服务器在内存上常见客户端连接的数据结构
-
连接认证,检查用户名,密码正确不
-
监听端口,等待命令
出现这个错误的原因,可能就是在连接到第2或3步骤的时候,断开了连接,
解决方法是:
在服务器进入mysql 输入 FLUSH HOSTS
或者执行 mysqladmin flush-hosts 命令
5. master操作
(1) 创建用户并授权
进入master:
mysql -h 82.157.192.57 -uroot -p1234Abc666 -P3310
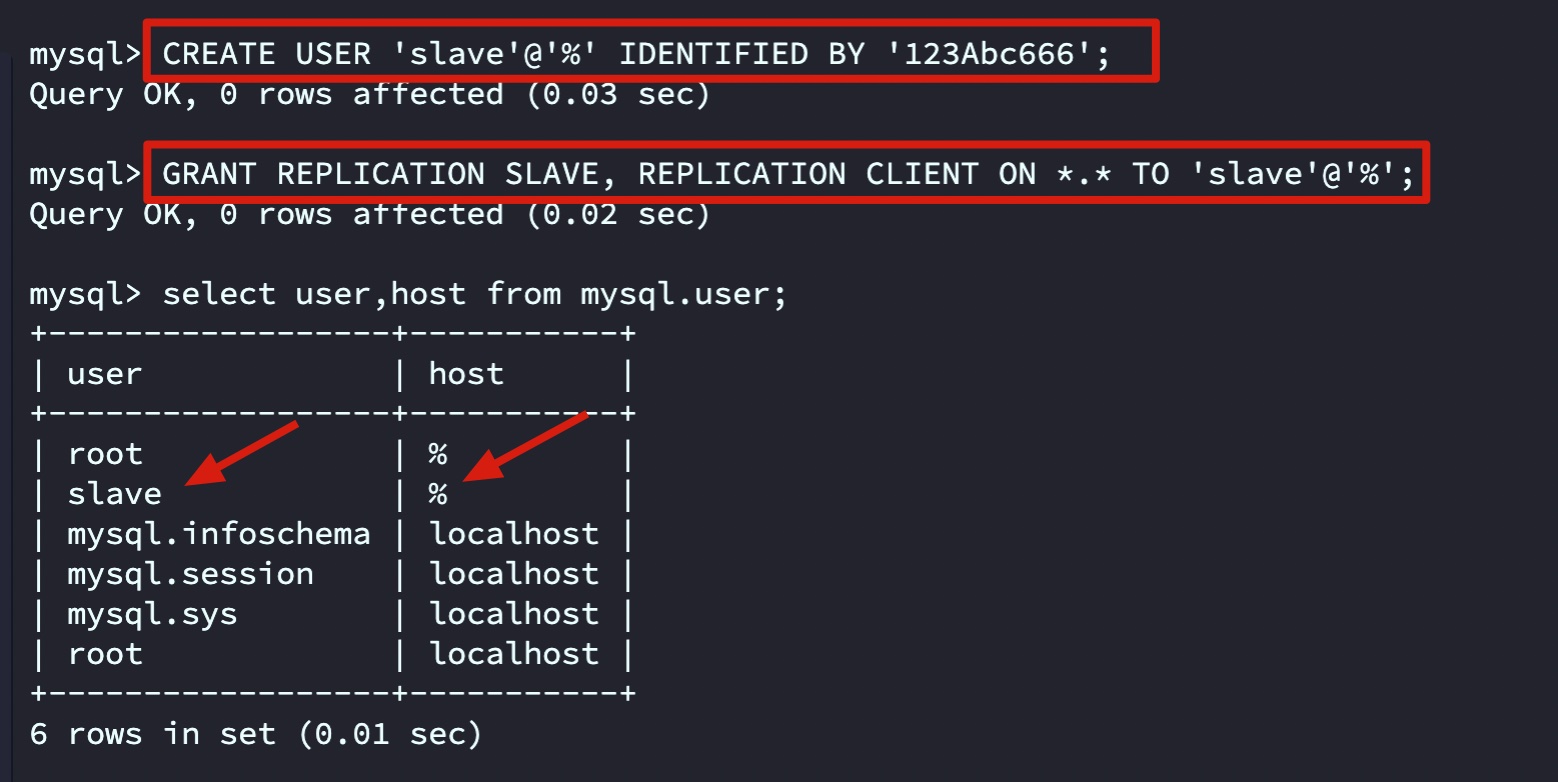
创建 slave 用户:
CREATE USER 'slave'@'%' IDENTIFIED BY '1234Abc666';
# CREATE USER '用户名'@'指定连接者ip,%代表所有ip' IDENTIFIED BY 'mysql密码';
授权:
GRANT REPLICATION SLAVE, REPLICATION CLIENT ON *.* TO 'slave'@'%';
# GRANT REPLICATION SLAVE, REPLICATION CLIENT ON *.* TO '用户名'@'%';
# *.* 可以配置其他权限,*代表所有权限
查看授权状态:
select user,host from mysql.user;
(2) 锁表
全局锁表操作,防止position状态码改变:
Flush tables with read lock;
(3) 查看主服务器状态
SHOW MASTER STATUS;

注:Position:是日志文件复制点,需要用在从服务器的配置中需要使用
6. slave操作
(1) 配置主从
进入slave:
mysql -h 82.157.192.57 -uroot -p1234Abc666 -P3320
创建 slave 用户:
change master to master_host='82.157.192.57', master_user='slave', master_password='1234Abc666',master_port=3310,master_log_file='mysql-bin.000003',master_log_pos=1327;

# 格式
change master to
	master_host='主库ip',
	master_user='主库授权用户',
	master_password='主库密码',
	master_port='主库端口',
	master_log_file='主库日志文件',
	master_log_pos='主库标识码';
(2) 开启服务
start slave;
(3) 查看从库状态
show slave status;

show slave status\G; # 更直观的查看
显示Slave_IO_Running 为 yes 则已经配置成功。
(4) 若产生异常
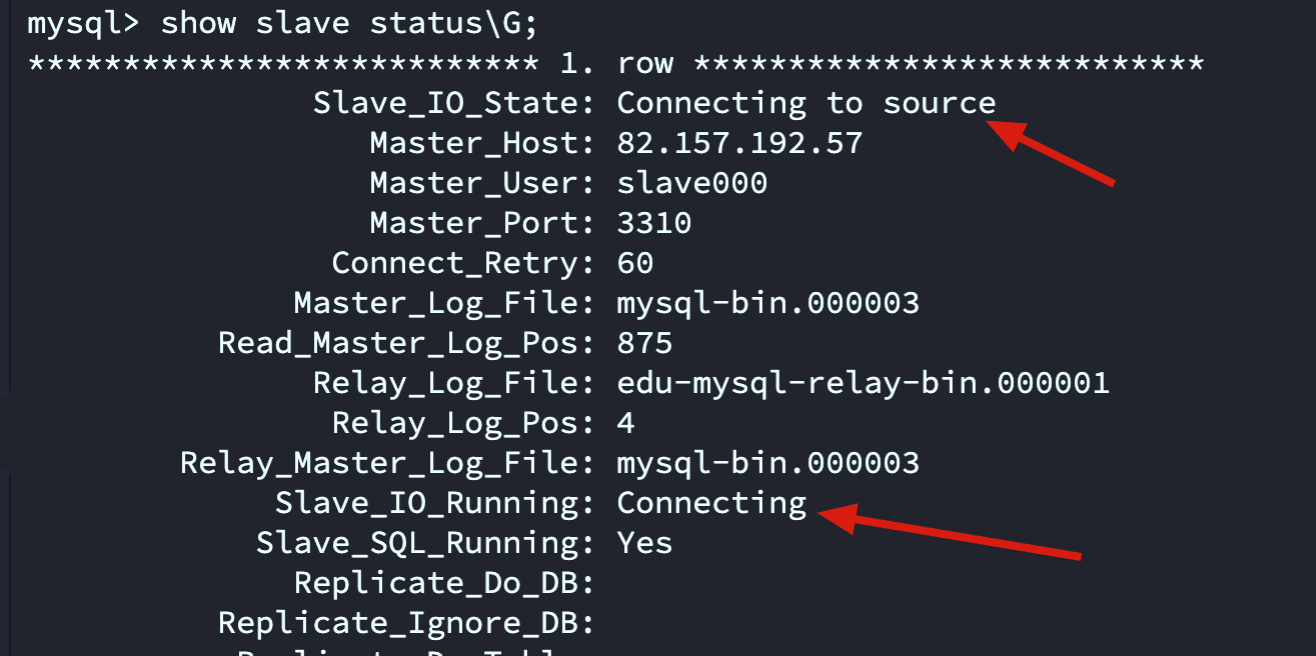
#下面不远处可以看到
Last_IO_Error: error connecting to master 'root@82.157.192.57:3310' - retry-time: 60 retries: 1 message: Authentication plugin 'caching_sha2_password' reported error: Authentication requires secure connection.
出现这个问题是因为mysql8之前的加密规则是mysql_native_password,而在mysql8之后,加密规则是caching_sha2_password, 解决问题方法有两种,一种是升级可视化管理工具的驱动,一种是把mysql用户登录密码加密规则还原成mysql_native_password。
第二种解决方法,在主库中执行:
unlock tables;	#先解锁
# 更改加密规则 -不同用户-ip-mysql密码-
ALTER USER 'slave'@'%' IDENTIFIED WITH mysql_native_password BY '1234Abc666';
flush privileges;	#刷新

Flush tables with read lock;	#锁表
show master status;		#查看状态,记录相应值
从库继续执行
stop slave; #停止主从复制
reset slave all; #清空所有的复制信息
change master to master_host='82.157.192.57', master_user='slave', master_password='1234Abc666',master_port=3310,master_log_file='mysql-bin.000003',master_log_pos=1327;
start slave; #开启从机复制
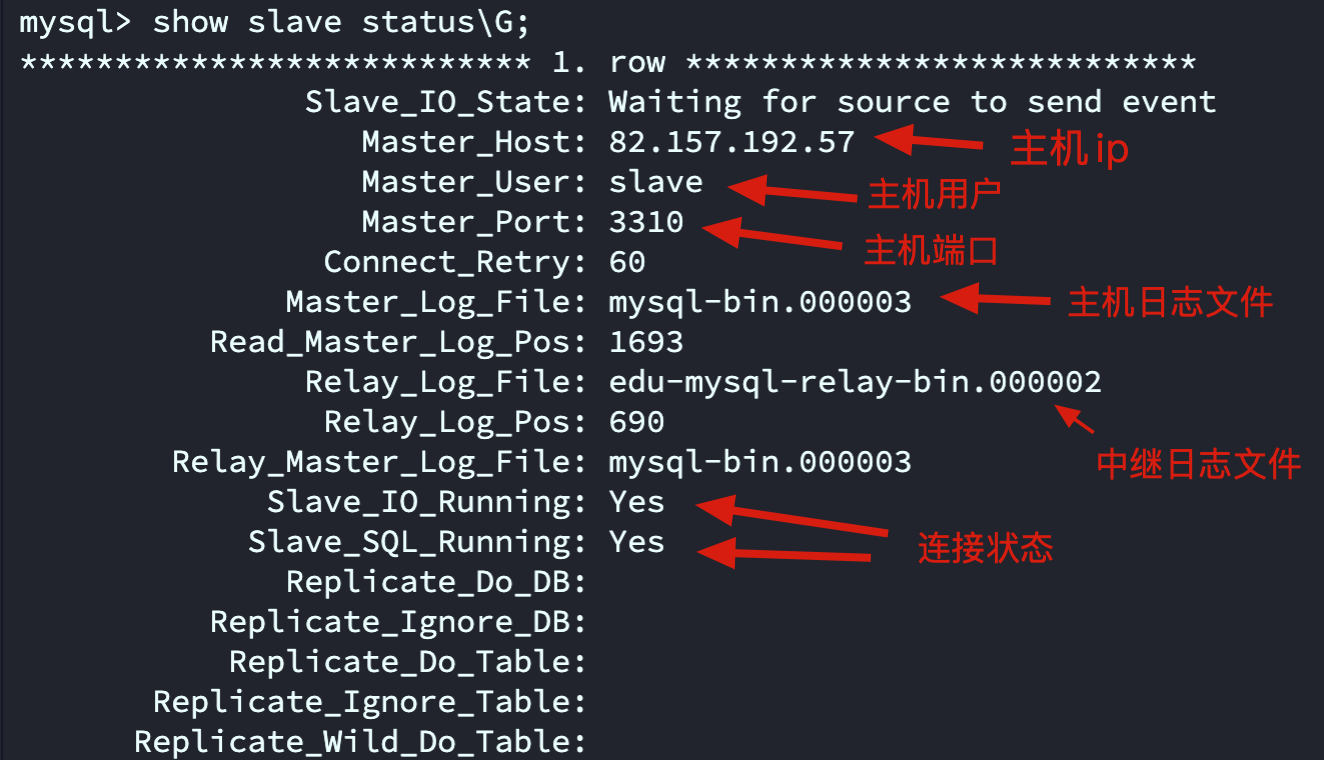
show slave status\G;
显示Slave_IO_Running 为 yes 则已经连接成功。
7. master操作
主库解锁表
unlock tables;
测试
- 在主库里新建数据库,从库里会同步展示
- 在从库里新建数据库,主库没有反应
- 以后的写操作都在主库,读操作都在从库
评论